Settings & data
Models and language
updated
The two transcription choices — which Whisper model runs and which language it expects — plus what you see while a model is being prepared.
Transcription has two settings and no more: which model runs, and which language it should expect. Both live on the Transcription section of the Oris app, and the defaults are the right answer for most people.
What you choose
- Transcription model — a dropdown of the available models, with Large v3 Turbo (recommended) as the default (a model set by hand in the config file appears as an extra row; there is no free-text entry). Larger models are more accurate but slower, and the default is a good balance. It is the model for meeting recordings, and for quick notes and dictation whenever their Speech engine is Most accurate (recommended) — the two faster engines have models of their own. The ⓘ beside the row says so.
- Language — the spoken-language hint. The default is Auto-detect (recommended), where Oris infers the language from the first few seconds of audio. To force a specific language, choose from the list (English, Spanish, French, German, Italian, Portuguese, Dutch, Japanese, Chinese, Korean); a code set by hand in the config file appears as an extra row. Transcription handles far more languages than the list shows, and summary quality depends on the provider and model you picked.
While a model prepares
Oris transcribes on your Mac, which means the first time it runs a model (and occasionally afterward) macOS has to prepare that model for the Neural Engine. That preparation is a one-time cost, but it can take a few minutes, and a silent few-minute wait is indistinguishable from a hang. This is the progress feedback that makes the wait legible.
During setup. The guided walkthrough’s model step shows a live strip: a download percentage for each model as it’s pulled down, and, once the download finishes, an explicit Compiling for the Neural Engine label so a bar sitting at 99% reads as “still working,” not stuck. When it’s done, the strip reports how long each phase took, so you can see where the minutes actually went.
During a recording. Most of the time the model is already warm and transcription starts instantly. But a model can go cold after a macOS update, or after a long stretch of not recording, and then Oris has to re-prepare it right when you stop a recording. When that happens the recording’s row in the Oris app’s Recordings section, the menu bar and the Obsidian status bar show Transcribing… with no percentage yet; the number appears the moment real transcription begins and climbs from there, so a longer-than-usual wait at the start is the model being prepared, not a hang.
Offline, once the model is on disk. Loading a downloaded transcription model is pure local work: Oris checks its own model cache first and reaches for the network only when that cache is genuinely missing something. A recording stopped on a plane, behind captive-portal Wi-Fi, or during an ISP blip transcribes exactly like one stopped on a healthy connection. The one transcription case that does need the network is a model that isn’t fully on disk yet (a first run, a switched model, an interrupted earlier download) — and that fetch simply runs under the same Transcribing… status as the rest of the work before the summary starts, rather than announcing itself separately.
For longer meetings. A long transcript may call for a larger summarization model than the one set up during onboarding, and that larger model is fetched the first time it’s needed. That download can be several gigabytes, so it runs under Summarizing… rather than a silent pause, and since you may not be looking at Obsidian at all, Oris also posts a one-time notification telling you it’s downloading a summarizer model and your notes will follow when it’s done. Any live recording that needs a summarizer model Oris hasn’t downloaded before gets the same heads-up, and a longer recording calling for a bigger model is simply the most common reason. (An imported audio file can trigger the same first-use fetch, but shows it in its import progress indicator instead of this banner.) Once it’s downloaded it stays cached, so the wait is a one-time cost per model.
What a download leaves on disk. A model is kept in one place — the shared model cache in your home folder — and that is the only copy Oris keeps. macOS stages a download through a temporary file first, and Oris clears that the moment the model lands, so downloading a model costs you the model and nothing more. Earlier versions left the staging copy behind, where it sat until the Mac was restarted; if you have copies from those versions, Oris cleans them up when it starts — no restart of your Mac, and nothing for you to do. It only ever removes a file it can prove is a duplicate of a model already in your cache and that nothing has touched for hours, so nothing else in that shared folder is at risk; a very recent duplicate simply waits for a later start.
None of this needs any action from you. It’s feedback, not a step. The point is simple: whether it’s your very first recording or your longest meeting yet, Oris tells you it’s working instead of leaving you guessing.
Where settings live
Oris settings live in the Oris app, not in the Obsidian plugin. Open the app after the setup walkthrough and its home window is the settings manager. Every on/off setting is a switch to the left of its label, and a small ⓘ beside a setting holds its explanation — click it and the explanation opens in a small panel, the way the help buttons in System Settings do. Click the ⓘ again, click anywhere else, or press Esc to close it, and only one is ever open at a time. It takes keyboard focus too, so Return or Space opens it without a pointer, and VoiceOver reads the text straight off the ⓘ.
The Obsidian plugin is a thin recording trigger. It starts and stops recordings and reserves the spot in your note where the transcript lands. Everything else, meaning provider, API keys, transcription model and retention, is configured in the app.
The window is split down the middle: a rail of seven sections on the left, and whatever that section holds on the right, grouped into boxes with a heading above each. Picking a section on the rail is the only navigation there is. Below the seven sections, pinned to the bottom of the rail, is the record button — wordless, a record circle that becomes a stop square, with one line under it that stays quiet until there is something to say — see recording from the Oris app — and under that the search field.
- General — setup status, walkthrough controls, the meeting-offer toggle and recording hotkey, startup and updates
- Transcription — transcription model, language
- Summaries — the summaries switch, Decisions & action items, note templates
- Providers — which provider writes your summary, which ones Oris may fall back to and in what order, and each one’s credentials and connection test
- Recordings — recent recordings and full history (including the ones still being processed), audio retention, auto-stop on silence. Its rail item carries one small icon: a pulsing ember dot while a recording is being processed, then a green check or a warning triangle until you open it
- Quick Notes — Quick Note: the master switch, destination, activation mode, hotkey, speech engine, AI cleanup, and the quick-notes viewer
- Dictation — Dictation: its switch, hotkey, activation, insertion method and the Accessibility row
Typed settings behave the same way everywhere: Return commits what you typed and takes the cursor out, clicking anywhere else does the same, and Escape puts back what the field held before you started typing. Nothing needs a Save.
Under the rail, in its own footer, sits the search field — and under that, the version of Oris you’re running. Hover that line and the tooltip adds the build number, which is what to quote in a bug report; Help → Copy My Usage Summary puts both on your clipboard along with the rest of what a support reply needs.
Find a setting by name
You don’t have to remember which section something is on. A search field sits at the bottom-left of the rail, under the seven sections, with ⌘F printed on it so you don’t have to remember the shortcut either — pressing it puts the cursor in the field from anywhere in the window (it’s also in the Edit menu as Find Setting). Type and the matching settings appear above the field, over the content, each showing its name over where it lives — Keep audio for over Recordings › Audio, say. Move through them with the arrow keys and press Return, or click one: Oris switches to that section, scrolls the setting into view and highlights it for a moment — the row blinks and then fades, the way System Settings does it — so you can see which control it meant. Escape clears what you typed. The highlight happens once, for the search that asked for it; coming back to that section later doesn’t light it up again.
Search looks at more than the visible label. Typing a word a setting used to be called finds it — structured notes still finds Decisions & action items, voice capture still finds Enable quick notes, mlx still finds the on-device model picker — and so does the jargon the labels deliberately avoid, the section a setting sits in, and the text of its ⓘ hint. Buttons are in there too, so walkthrough, update, reload plugin and test connection all land somewhere useful. A second word narrows rather than widens: azure key gets you the Azure key field and nothing else.
Launch Oris at login, and how to turn it off
Your hotkeys, dictation, meeting detection and the menu bar icon all run inside the Oris app, so none of them work until Oris is running. Settings → General → Startup & updates has a single Launch Oris at login switch that decides whether macOS starts it for you. When it’s on, logging in brings Oris up quietly in the menu bar — no window opens; click the menu bar icon or the Dock tile whenever you want the window back.
The setup walkthrough offers this once, near the end. If you decline, it never asks again — the switch here is how you change your mind, in either direction.
To turn it off: switch Launch Oris at login off under Settings → General → Startup & updates, and Oris removes itself from your login items. You can also do it from macOS’s own side, in System Settings → General → Login Items & Extensions, where Oris appears under “Open at Login”; remove or disable it there and Oris’s switch follows the next time you open the window — it reads macOS’s answer rather than remembering its own. If macOS is the one refusing (you turned Oris off out there earlier), the switch says so and offers a link straight to that pane.
Below every tab sits the Oris Pro signup banner — or nothing but a small Pro chip in the title bar, once Pro is on.
How it works underneath
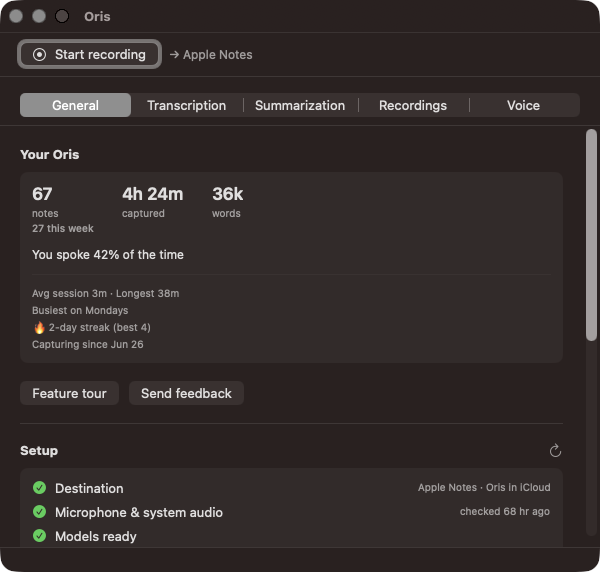
Every control on the General section
- Your Oris — a stats card summarizing how you have used Oris so far. See Your Oris.
- Destination — where your meeting notes, quick notes, and imports land: an Obsidian vault, a Markdown folder, or Apple Notes. A file destination reports its kind and its path; when something is wrong, such as a vault or folder that moved or a store Oris can’t read, the row says exactly what, so you find out before a recording does. Quick notes follow this same destination; whether a capture is written into it or kept in Oris’s own inbox is the placement choice on the Quick Notes section. A Quick notes row appears under it only in the odd state where quick notes are routed somewhere other than the destination shown — a healthy setup shows nothing extra. If you’ve switched away from a destination that still has notes waiting to reach it, a line says how many and points at Recordings. Switching is a dropdown on the row itself: pick the kind you want and fill in whatever it needs from the button beside it. It applies as soon as the choice is complete — there’s no confirm step. See Obsidian and Markdown.
- Setup status — a compact health summary of what’s left to confirm: plugin install (Obsidian destinations only), microphone and system-audio permissions, model warmup, and notifications. It loads quietly on every app open, and no animation runs unless you explicitly request a re-check. The plugin row also checks again whenever you switch back to Oris, so enabling or reloading the plugin in Obsidian shows up as soon as you return. The ↻ button re-reads the Destination section above it as well, in case you changed your destinations outside Oris.
- Apple Notes access — present only when your destination is Apple Notes. It reads allowed, not set up yet, turned off, or not checked, and its button is the fix for that state: Grant access raises the one macOS prompt when the permission has never been asked for (a caption explains the ask first, and the row updates itself with the answer), and Open System Settings opens the Automation pane when it has been turned off, with the re-check running on its own when you come back to Oris. A quiet Check again link re-reads the answer without asking anything. Not checked is where the row usually rests until you ask: reading the answer means launching Notes, and opening a settings tab is not a reason to open Notes, so Oris reads it by itself only when Notes happens to be running already; with Notes closed the row waits for its Check button. See Apple Notes.
- Re-check permissions — runs the test capture in place, the same ~8-second capture the walkthrough uses, without requiring a full walkthrough re-run. Use this after adjusting audio routing or system-audio settings to confirm both tracks are live. It declines to run while a recording or a quick note is in flight, since its chimes would land in that capture; finish or stop it first, then re-check.
- Notifications — shows whether Oris is allowed to post notification banners for notes-ready, auto-stop and summary-failed. Banners are posted by the recorder, so if you denied the notification prompt, or later revoked it in System Settings, banners silently stop and this row flags it. It has its own Re-check button and, when notifications are off, an Open System Settings → Notifications link so you can re-enable Oris.
- Feature tour — opens the in-app tour of what Oris can do. See Feature tour.
- Send feedback — opens the feedback sheet. See Send feedback.
- Re-run walkthrough — resets walkthrough progress so you can step back through plugin install, permissions, and model warmup. It’s for repairing a setup that’s stopped working, not for switching destinations on purpose: a destination that’s already working fast-forwards past itself, the same as any other finished step. To change where notes land deliberately, use the Destination row’s dropdown above instead.
- Startup & updates — the Launch Oris at login switch (see above), then an Automatically check for updates toggle, on by default, so Oris checks daily in the background and prompts you to install when a new version is found. Next to it is a Check for Updates… button to check right now. See Updates.
- Share anonymous system info — on by default. The daily update check carries a small profile: macOS version, Mac model and CPU, your app and update-tool versions, preferred language. That list is the whole of it, never your audio, recordings, or notes. Turn it off and the update check still runs, just without the profile.
- Version footer — current build info.
Destination changes are the one exception to the rule below: the sheet has its own explicit Save button, because a destination write can install the Obsidian plugin, move where your recordings folder lives, or create a note the moment it’s confirmed — side effects that shouldn’t fire on a keystroke. Everywhere else on this tab, there is no Save button. Changes persist on their own, a toggle or a dropdown the moment you flip it and a text field a moment after you stop typing, and a brief “Settings saved” confirmation appears when it lands. A change you made in another window isn’t reverted by an unrelated change you make here.
That confirmation belongs to Transcription, Summaries, Providers, Recordings, Quick Notes, and Dictation, and to General’s Offer to record meetings toggle. General’s two Sparkle preferences, Automatically check for updates and Share anonymous system info, take a different route: they save the instant you flip them but show no banner.
One combination is deliberately held back rather than written: a Quick Note destination of Pinned note with an empty note path. The form keeps showing your selection and the Quick Notes section explains why, but what actually gets saved is the in-app-inbox default, which is exactly where captures would land anyway. Fill the path in and it saves normally.